2022.11.12 - Wireguard
Intro
Przetestowałem konfigurację WireGuard’a z moją aktualną siecią (UPC w domu, njumobile w pracowni - dodatkowe NATowanie po stronie Orange, więc brak możliwości wystawienia czegokolwiek na świat)
Przyjęta adresacja
# Sieć
Sięć domowa    - 192.168.0.0/24
Sieć pracowni  - 192.168.3.0/24
Sieć WireGuard - 172.27.0.0/24

# Hosty
UPC            - 192.168.0.1
Komp           - 192.168.0.7
RPI2           - 192.168.0.9 / 172.27.0.4

pfSense        - 192.168.3.1 / 172.27.0.3
RandomServer   - 192.168.3.253
Konfiguracja RasperryPi
Instalacja WireGuard na RPi2 jest prosta bo idzie z pakietów
$ apt install raspberrypi-kernel-headers
$ apt-get install wireguard wireguard-tools
Po instalacji trzeba zrestartować Pi sudo reboot (przynajmniej tak było w moim przypadku)
Po restarcie dodanie nowego interfejsu powinno zadziałać
$ ip link add dev wg0 type wireguard
Konfigurację najlepiej zrobić toolsami (wg albo wg-quick)
$ wg --help
Usage: wg <cmd> [<args>]

Available subcommands:
  show: Shows the current configuration and device information
  showconf: Shows the current configuration of a given WireGuard interface, for use with `setconf`
  set: Change the current configuration, add peers, remove peers, or change peers
  setconf: Applies a configuration file to a WireGuard interface
  addconf: Appends a configuration file to a WireGuard interface
  syncconf: Synchronizes a configuration file to a WireGuard interface
  genkey: Generates a new private key and writes it to stdout
  genpsk: Generates a new preshared key and writes it to stdout
  pubkey: Reads a private key from stdin and writes a public key to stdout
Dokumentacja opisująca strukturę pliku conf jest pod linkiem https://git.zx2c4.com/wireguard-tools/about/src/man/wg-quick.8 (wg-quick ma więcej opcji w conf niż wg - jest komenda wg-quick strip)
Generowanie kluczy prywatnych i publicznych
$ wg genkey > private
$ wg pubkey < private
Utworzyłem plik w /etc/wireguard/wg0.conf dla wg-quick
# home network
[Interface]
Address = 172.27.0.4/24
MTU = 1400
FwMark = 0x7767
PrivateKey = <server-private-key>
ListenPort = 51820

# workshop network
[Peer]
PublicKey = <client-public-key>
PresharedKey = <client-preshared-key>
AllowedIPs = 172.27.0.0/24,192.168.3.0/24
PersistentKeepalive = 25
Keepalive jest potrzebny do utrzymania NATu po stronie njumobile
Uruchomienie tunelu
$ wg-quick up wg0
Aktualizacja ustawień
$ wg syncconf wg0 <(wg-quick strip wg0)
Na routerze UPC dorzucony port-forwarding.
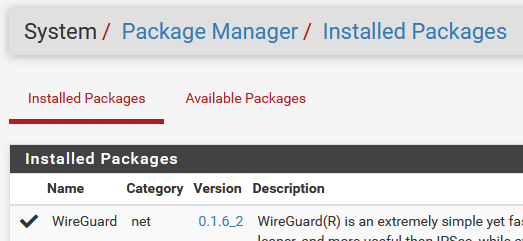
Konfiguracja pfSense
Trzeba doinstalować pakiet
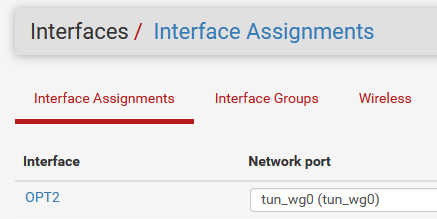
Następnie dodajemy tunel

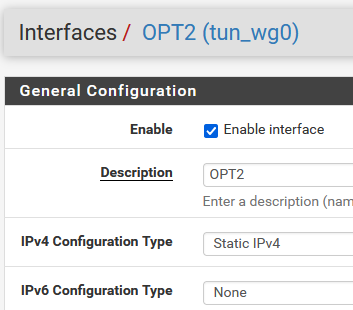
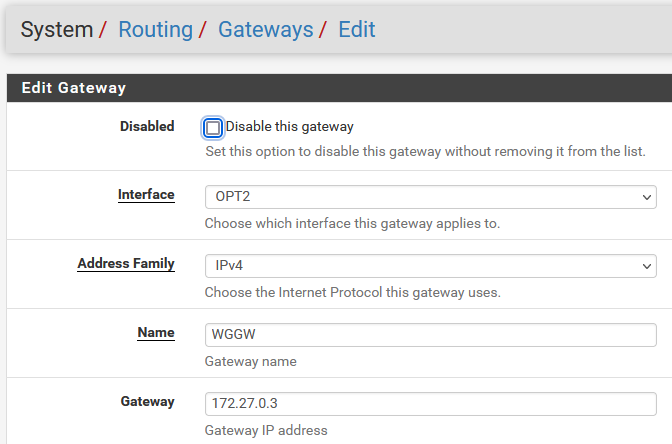
Przypisujemy interfejs (u mnie OPT2)
Ustawiamy IP (u mnie 172.27.0.3/24)
Dodatkowo MTU ustawiłem na 1400 - info w necie https://gist.github.com/nitred/f16850ca48c48c79bf422e90ee5b9d95
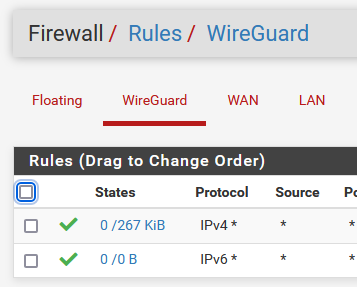
Tworzymy reguły FW - nie wiem czy potrzeba ale dodałem takie same reguły dla OPT2
Dodajemy Gateway
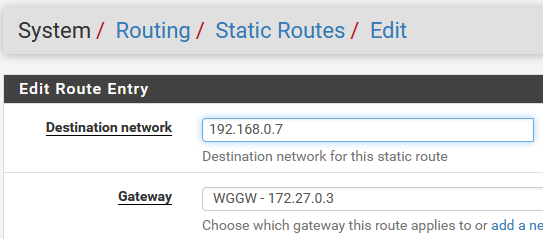
Oraz trasę statyczną do mojego kompa
Na końcu dodałem Peer’a dla WG z dozwolonymi sieciami

Po chwili pracownia podłączyła się do sieci domowej
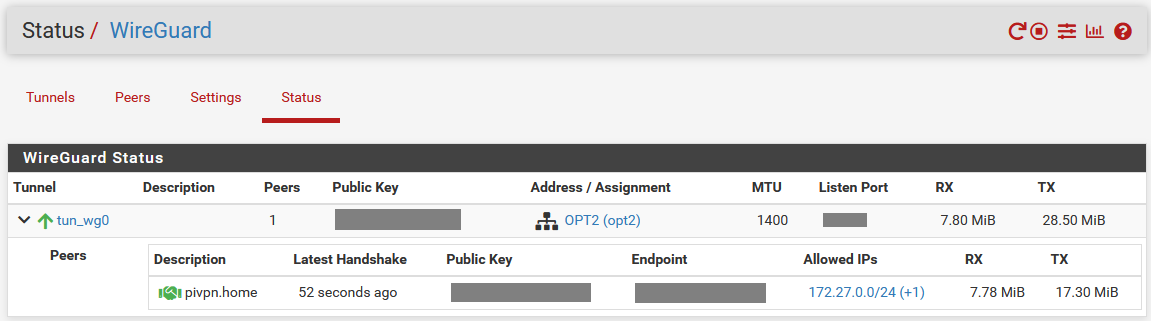
Status po stronie PIVPN
$ wg
interface: wg0
  public key: <cut>
  private key: (hidden)
  listening port: <cut>
  fwmark: 0x7767

peer: <cut>
  preshared key: (hidden)
  endpoint: <cut>
  allowed ips: 172.27.0.0/24, 192.168.3.0/24
  latest handshake: 1 minute, 26 seconds ago
  transfer: 22.35 MiB received, 8.16 MiB sent
  persistent keepalive: every 25 seconds
Test połączenia
Na PIVPN dodałem trasę do jednego hosta
$ sudo route add -host 192.168.3.253 metric 0 dev wg0

$ route
Kernel IP routing table
Destination     Gateway         Genmask         Flags Metric Ref    Use Iface
...
192.168.3.253   0.0.0.0         255.255.255.255 UH    0      0        0 wg0
...
Na komputerze domowym dodałem route’a via RPi
PS> route -p ADD 172.27.0.0 MASK 255.255.255.0 192.168.0.9 METRIC 95
Z sieci domowej widać hosta WG po stronie pracowni
# komputer domowy
PS> ping 172.27.0.3

Pinging 172.27.0.3 with 32 bytes of data:
Reply from 172.27.0.3: bytes=32 time=64ms TTL=63
Reply from 172.27.0.3: bytes=32 time=63ms TTL=63
Reply from 172.27.0.3: bytes=32 time=59ms TTL=63
Reply from 172.27.0.3: bytes=32 time=72ms TTL=63

Ping statistics for 172.27.0.3:
    Packets: Sent = 4, Received = 4, Lost = 0 (0% loss),
Approximate round trip times in milli-seconds:
    Minimum = 59ms, Maximum = 72ms, Average = 64ms
Pingowanie i wejście na HTTPS odkłada się do logów prawidłowo

Komunikacja z PIVPN też wygląda dobrze
# pivpn
root@pivpn:~# traceroute -4 -T 192.168.3.253
traceroute to 192.168.3.253 (192.168.3.253), 30 hops max, 60 byte packets
 1  172.27.0.3 (172.27.0.3)  158.550 ms  158.371 ms  166.330 ms
 2  192.168.3.253 (192.168.3.253)  166.135 ms  165.975 ms  166.307 ms

root@pivpn:~# traceroute -4 -T -i wg0 192.168.3.253
traceroute to 192.168.3.253 (192.168.3.253), 30 hops max, 60 byte packets
 1  172.27.0.3 (172.27.0.3)  59.417 ms  66.819 ms  72.106 ms
 2  192.168.3.253 (192.168.3.253)  71.728 ms  71.502 ms  71.789 ms

root@pivpn:~# traceroute -4 -T -i tun0 192.168.3.253
traceroute to 192.168.3.253 (192.168.3.253), 30 hops max, 60 byte packets
 1  10.15.5.2 (10.15.5.2)  59.213 ms  66.880 ms  66.885 ms
 2  192.168.3.253 (192.168.3.253)  66.944 ms  68.757 ms  68.930 ms
Czy działa niezawodnie dowiem się jak wyłączę ovpn 😀
Linki
- https://www.wireguard.com/quickstart/
- https://www.howtogeek.com/657780/how-to-use-the-traceroute-command-on-linux/
- https://www.howtogeek.com/howto/windows/adding-a-tcpip-route-to-the-windows-routing-table/
- https://git.zx2c4.com/wireguard-tools/about/src/man/wg.8
- https://git.zx2c4.com/wireguard-tools/about/src/man/wg-quick.8